Same day shipping / Next day delivery
The UK's home of peelable, sprayable paint since 2012

 Need colours for the CLEAR SWPX?   AF vs AFX Application 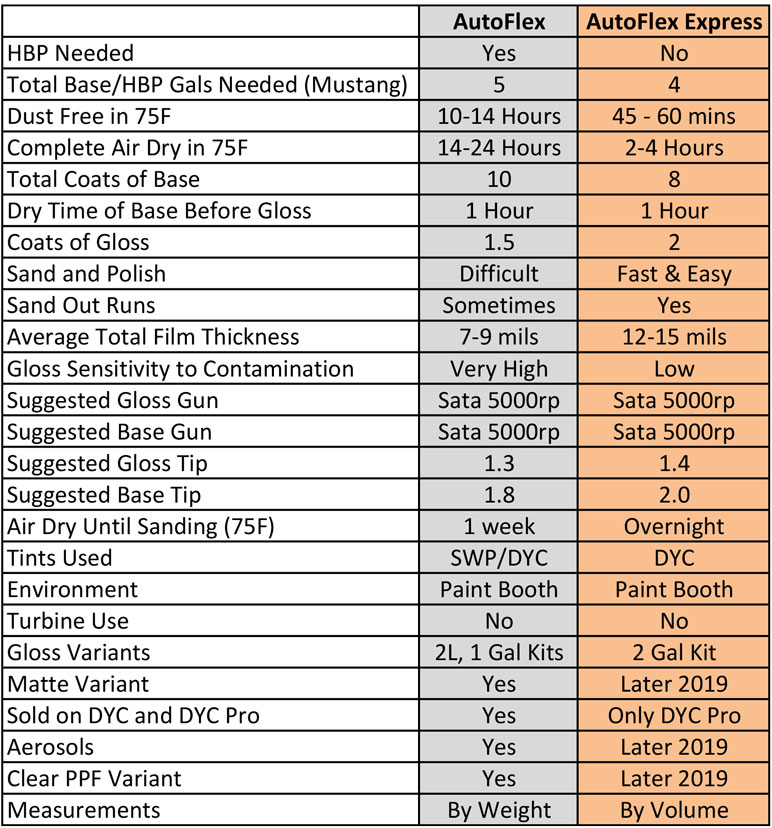 AutoFlex Express Peelable Paint System
Complete Application and Technical Guide (1.2 Last revised 3/20/2019) GENERAL INFO AND EQUIPMENT
Product System Components: - Spray Wrap Pro X: Coating used for all base, color, pearl, metallic coats - AutoFlex Express High Gloss Clear: Part A in a 3 Part Gloss System - AutoFlex Express Gloss Activator: Part B in a 3 Part Gloss System - AutoFlex Express Gloss Optimizer: Part C in a 3 Part Gloss System - DYC Pro Tints: The colored pigments used in Spray Wrap Pro X Equipment Required: - Full, enclosed paint booth with proper air extraction - Compressor, 60 gal minimum - HVLP/RP spray gun o Recommended gun: Sata 5000b RP o 2.0 tip for base coats o 1.4 tip for gloss topcoats Vehicle Preperation:
- Vehicle should be washed 24 hours before you plan on spraying to allow all moisture to completely evaporate. Vehicle must be 100% dry before application begins, no exceptions. Blowing water off car with compressed air is not sufficient and will still leave moisture. Overnight dry time after wash is required. - Vehicle should be masked appropriately. Cover all windows, lights, trim, etc per standard automotive painting practices. - After masking is complete, begin to further clean and prepare the surface: o Wipe entire car with DYC PreDip Spray to remove all surface dust, dirt, debris, grease, and fingerprints. o Follow PreDip Spray with a solvent wipedown. Any solvent-based prep solution will work, if none available use Naphtha. o Allow vehicle surface to air dry after wipedowns USING SPRAY WRAP PRO X
General Base Coat Instructions: - Use Spray Wrap Pro X for all base, color, pearl or metallic coats - Apply no less than 8 wet coats of SWPX per vehicle - Use a 2.0 tip for SWPX - Always properly blend SWPX for 60 seconds or longer before use - Set your PSI to between 18-20psi when delivering product - Always start with Clear SWPX, do not start with tinted product. Your first 2.5 coats (or more) of base should be Clear SWPX, and then proceed with color coats. - Start with one medium of coat at 50% coverage - All other coats should be wet, overlapping coats until you reach a minimum of 8 wet coats - Allow each base coat to become completely dry to the touch before applying the next coat o Expect between 15-30 minute flash times between coats depending on temps Base Coat Best Practices and Troubleshooting:
- All base coats (after the first 50% coat) should be smooth and even with minimal to zero texture - If your base coats are resulting in a surface texture, you are not applying the coats wet enough. Practice applying wet coats utilizing a 50% overlap. - The entire panel surface should appear “glossy” wet immediately after application. If a portion of the panel is dry before the panel is completed, you are more than likely not applying the coating wet enough. - If you are seeing dry spray or “strings” out of your gun it could be for one of several reasons: o Your tip size is too small, 2.0 is recommended o Your PSI is too high, 18-20psi is recommended o Your temperatures inside the booth are extreme (95F+). An addition of 10% Xylene by volume should alleviate that issue. - If you are seeing a sandy texture on the panel, you are either spraying too dry, from too far away, or one of the three issues listed above. - Do not mix and match SWPX with any other coating systems - Only apply DYC Pro Tints to SWPX. Do not experiment with other tints and colorants. Base Coat Tinting and Additives:
- Only apply DYC Pro Tints to SWPX. Do not experiment with other tints and colorants. - Pearls can be added to SWPX, although do not exceed a load of 75 grams per gallon - Kandy concentrates can be added to SWPX, however are not recommended as they add too many variables. Each concentrate uses different solvents and can affect the coating differently. Use at your own risk and TEST before a vehicle. - Metal flakes can be used in SWPX, however will need to be buried by multiple coats of Clear SWPX before gloss is applied. - ALWAYS seal in any pearls or metallics with 1-2 wet coats of Clear SWPX before gloss is applied. USING AUTOFLEX EXPRESS GLOSS CLEAR
Gloss Topcoat Mixing Instructions:
- AutoFlex Express Gloss is a 3 part system o Part A – AutoFlex Express High Gloss Clear o Part B – AutoFlex Express Gloss Activator o Part C – AutoFlex Express Gloss Optimizer - Never use AFX Gloss without all 3 components - Part A and Part B are mixed by volume at a 1:1 ratio o Example: 16 ounces Part A, and 16 ounces Part B = 1:1 ratio - Part C is mixed at 12% of the combined Parts A&B o Example: Part A at 50 ounces, Part B at 50 ounces = 100 ounces. 12% of 100 ounces = 12 ounces of Part C. o Always round Part C up to the nearest whole number - Example for mixing 1 gallon of sprayable gloss: o 64 ounces Part A o 64 onces Part B o 16 ounces Part C (15.36 ounces rounded up to 16 ounces) - All vehicles will differ, all spray styles will differ. There is no set guide for “how much gloss” you will need per vehicle. As a rough guide, a standard sedan will use between 3/4 – 1 gallon of sprayable gloss. Your spraying style over time will help you determine how much gloss you will need per vehicle. - When mixing for a target volume, for example 1 gallon, you will always end up with more than the target due to the Optimizer. For example mixing one gallon (64 ounces Part A + 64 ounces Part B), will actually produce 144 ounces (vs a standard gallon 128 ounces) due to the additional Optimizer. Plan for this when determining how much material to mix. - Always mix gloss components thoroughly before use - Always strain gloss through cone filters as it’s poured into the paint cup Gloss Topcoat Spraying Instructions:
- Apply AFX Gloss using 1.4 tip - PSI will differ based on preference and gun used, but suggested starting point is 35 psi - Always allow the last coat of SWPX to dry 1 additional hour after it is dry to the touch. Allowing the base coats to properly flash out is important. - Apply 2 wet coats of AFX Gloss. Coats should be wet, overlapping coats allowing the gloss to flow and level - Flash times between gloss coats should be between 5-10 minutes depending on temps o You want the first coat of gloss to be tacky, not dry, before the next coat o For example in 80F, 8 minutes between coats is standard - 3 coats of gloss can be applied if desired - Gloss will self level for 10-15 minutes after application if applied correctly - Allow fans to run in booth for 30+ minutes after gloss is applied Gloss Dry Times:
- AFX Gloss should be dust free/finger slick in 15-30 minutes depending on temps - AFX Gloss should be dry enough to handle in 2-4 hours depending on temps - AFX Gloss should be ready for paint correction (sanding and polishing) 24 hours after the gloss is applied (or sooner in warmer temps) - AFX Gloss can be baked at 140F for 2-30 mins if desired. Allow gloss to air dry for 15 mins before baking. - Do not apply a wax to AFX Gloss for 90 days - Do not apply a sealant to AFX Gloss for 90 days - Do not apply a ceramic coating to AFX Gloss for 90 days Gloss Best Practices and Troubleshooting:
- Always blend Part A and Part B together before adding Part C. Add Part C, then blend again - First coat of gloss may look peely or have pinholes, however the second coat (if applied correctly) should flow it out and level it down. - If when dry your gloss looks pixelated or has excessive small surface peel all over, chances are you sprayed the gloss too dry. - ALWAYS practice spraying the gloss on test panels before applying to a vehicle for the first time. - AFX Gloss can be flow-coated if needed. o Allow gloss to dry overnight o Sand surface with 1200 grit o Wipe surface with Naphtha or solvent wipe o Flow coat more gloss on top as normal Gloss Correction (Sanding and Polishing):
- AFX Gloss should be ready for paint correction 24 hours after initially applied (or sooner in warm temps) - Sand gloss as desired, then buff or polish - Sanding and polishing procedures widely vary based on preference, however here are some examples: o General surface clean up of dust, debris, or small scale peel reduction: § Sand with 2000 § Sand with 3000 Trizact or Foam disc § Sand with 5000 Trizact or Foam disc § Compound and Wool Pad, finishing pads § Polish o More intense peel reduction or mirror finish: § Sand with 800 § Sand with 1000 § Sand with 1200 § Sand with 1500 § Sand with 2000 § Sand with 3000 Trizact or Foam disc § Sand with 5000 Trizact or Foam disc § Compound and Wool Pad, finishing pads § Polish § (3 coats of gloss can be applied if this type of correction is intended. Not required, but helpful) AUTOFLEX EXPRESS CLEANING AND AFTERCARE
Washing, Waxing, Detailing, Sealing
- AFX must breathe for 90 days. Do not seal or wax the gloss for 90 days - Allow AFX to dry for 24 hours before washing - After 24 hours, wash AFX with a wax-free and sealant-free car wash soap - Quick Detailers can be used, however make sure the products do not contain waxes or sealants - Official AFX Waxes and Sealers that specifically allow the coating to breathe will be available early 2019. AUTOFLEX EXPRESS PEELING AND REMOVAL
- AFX should only be removed by a professional. Clients should not be peeling their own cars
- AFX should be warm to the touch before peeling begins. o Allow the vehicle to sit in direct sunlight for 2-3 hours before peeling o If sun isn’t available, use heat gun to carefully bring gloss up to 100F before peeling o AFX was designed to become more flexible with heat – do not peel AFX while it is cold to the touch. - Always split panels down the center and peel towards the edges. Peeling towards the edges will minimize any leftover scraps or pieces. Important Contact Info: Technical Support: 855-847-5825 AutoFlex Applicator FB Group: facebook.com/groups/AutoFlexCoatings www.AutoFlexCoatings.com www.DipYourCar.com |